We’re big fans of Gmail here at fairly marvellous Towers. We use and recommend G Suite, the paid option, but what if you have a free email account with your web hosting, don’t want to spend any more money, but do want the power of Gmail?
To do this you’re going to need the following:
- A free Gmail account (although you can also do this with a G Suite account if your admin allows it)
- A POP3 mailbox – as provided with most web hosting. All fairly marvellous packages come with free IMAP accounts but they can also be used for POP3.
- Your username and password for the mailbox
- The server settings for the mailbox – we’ll include the settings for our clients below.
The full process is shown in this video…
…but if you’d rather not listen to my dulcet tones here are the key points:
1. Gmail Settings
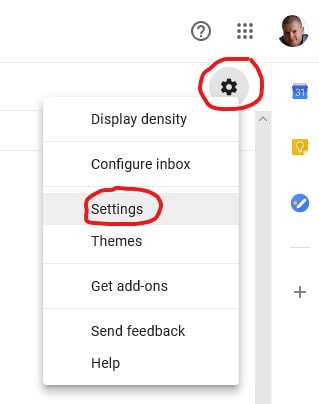
2. Accounts and Import
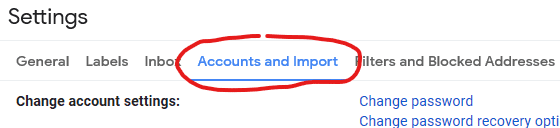
3. Check mail from other accounts: Add a mail account

Enter your email address and select the POP3 option, click next.
4. Enter account and server details
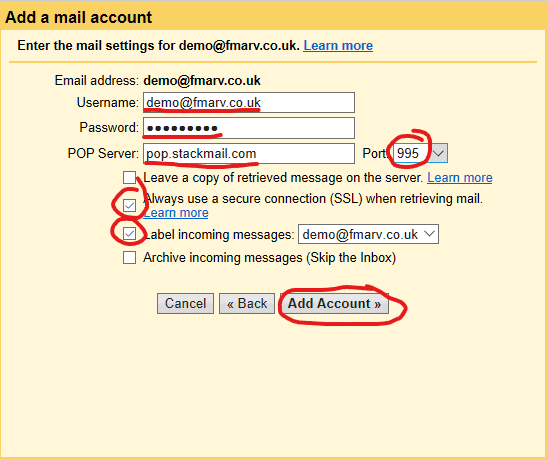
For most of our clients, they are as follows:
- Username is your email address
- Password will be provided
- POP server is pop.stackmail.com port 995
- Do not tick Leave a copy of retrieved message on the server
- Tick always use a secure connection
- Label incoming messages is optional
- Do not tick Archive incoming messages
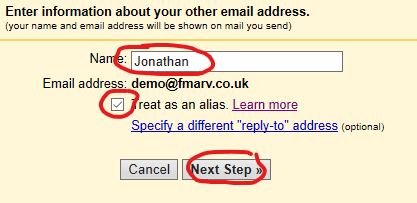
5. Send mail as…
Select “Yes, I want to be able to send mail as…” and click Next.
Enter the name you wish to appear on emails you send and leave “Treat as an alias” ticked.
6. Outgoing server settings
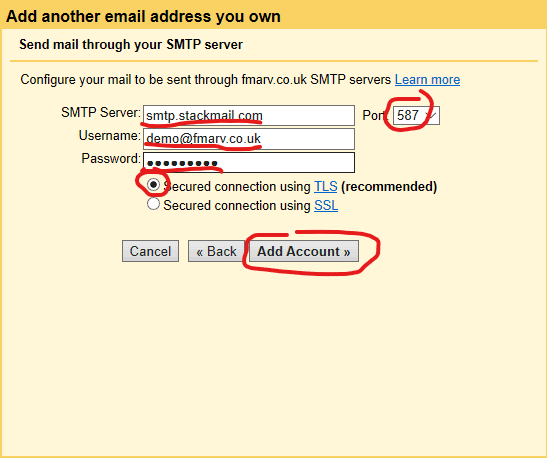
For most of our clients they are:
- Username is your email address
- Password will be provided
- SMTP server is smtp.stackmail.com port 587
- Leave Secured connection using TLS selected
7. Verify address
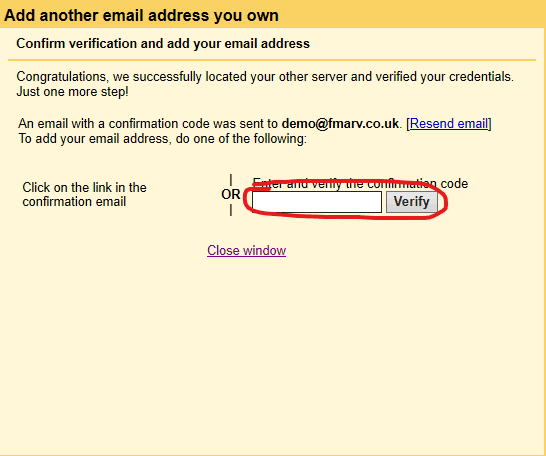
Google will send an email to your address to confirm that you really own it before allowing you to send from it. You’ll either have to keep your other webmail client open in another tab or just wait for Gmail to pick up the email from it.
You can close this window if you cannot be bothered to wait and just click on the link when the verification email arrived in Gmail.
8. Sending defaults
You may want to make your external account your default from address, and you’ll probably want to ensure you have “Reply from the same address the message was sent to” selected. This just avoids confusing your clients!